Tuesday, February 26, 2019

Charge Your iPhone without Charger (iOS 12 supported)

 Charge Your iPhone without Charger (iOS 12 supported)
Method 1: Use Your Laptop or Personal Computer

This will only work if you have a USB cable. If you do have a USB cable but no power block, you can plug your phone into your laptop or personal computer. If you don’t have access to a computer, you can borrow one or head on down to the library, a college computer lab, the Apple Store or an electronics store.


Method 2: Use A Portable Battery

The availability of portable batteries means that you can charge your iPhone even without a charger. There are so many different kinds to suit every budget. Ensure that you choose the battery pack carefully since they come in different voltage. Once you have your portable battery, here’s how to use it.

Step 1: Attach a USB cable to the portable battery pack and attach the other end to your iPhone.

Step 2: Turn on the battery pack and see if your iPhone is charging normally.

You can even find battery packs that can be permanently attached to the back of your iPhone to ensure a steady supply of power to the device. These packs do need to be charged once their power runs out.


Method 3: Use Your Car Charger

If you have a car charger, you might use it to charge your device in emergencies. It may be slower than what you are used to with your regular charger, but it is invaluable for those times when you need to charge your device but don’t have a charger.

To use it, you simply need to connect one end of the USB cable to the device and the other to the car charger.


Method 4: Depend on Devices with USB Ports

Just as you would use your laptop or personal computer to charge the iPhone, you can use any device with a USB port to help you charge your iPhone if you don’t have a charger. In this way, having a USB cable can be a life-saver.

Also Read:Top 6 Best Alternative Sites to YTS Torrent Movie Website 2019

Also Read:How to Factory Reset Your iPad without Passcode or iTunes

All you have to do is to connect one end to the iPhone and the other end to the device with the USB port and the iPhone will start charging. Some common devices with USB cables include stereos, bedside clocks and TVs.


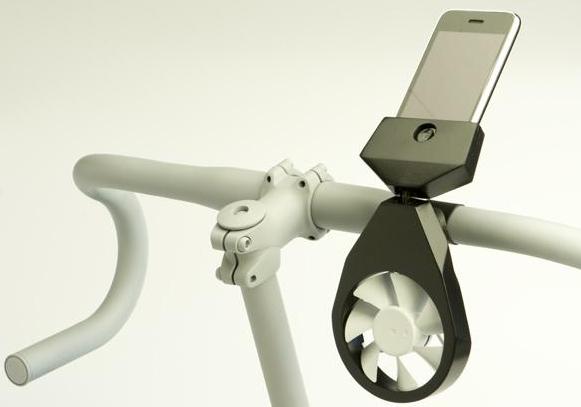
Method 5: Use A Wind Turbine

A small wind turbine also offers you a great way to charge your iPhone. These are available at local electronic and outdoor supply stores. Once you’ve purchased one, here’s how you use it to charge your device.

Step 1: Read the manufacturers instructions on how to connect the wind turbine to the iPhone.

Step 2: Once connected, take it with you outdoors on a walk or biking. If it’s windy outside, your device will charge in about 5-6 hours.


Method 6: Use A Solar-Powered Charger

Another great alternative is a solar-powered charger. It also helps that you can charge outside in the sun and store the energy for later use. Just connect the iPhone to the solar-powered charger and the phone should begin to charge.


Method 7: Use A Hand-Crank Machine

A hand-crank machine gives you the ability to charge your phone using nothing but your muscles. It might even be a great way to get some exercise and it works. Once you’ve purchased a hand crank machine, follow these steps to use it to charge the device.

Step 1: read the manufacturer’s instructions and crank up the machine until you have collected enough power on it.

Step 2: Plug in the iPhone and then continue to crank the device until the iPhone charges. It may take about 2-3 hours to charge.


Method 8: Use A Campfire Charger

There are some chargers that can be attached to your camping pots and pans. They work by absorbing heat from the campfire that they then turn into energy. You can use it by setting the pot on the campfire, plugging in the cable into your iPhone and simply waiting for the iPhone to charge while you cook.


Method 9: Use 4 X AA Batteries

You can also use AA batteries to charge your iPhone or any other device. They are widely available and can be used just abut anywhere. You need to combine 4 of these AA batteries and together they can be used to charge your device. To connect them, you need a battery holder. The power from the 4 connected batteries is the same as you would get from the charging cord.


Method 10: DIY A Fruit Battery

In extreme circumstances, you can make your own battery out of fruit. The process is a little complicated and you’ll still need a charger cable but not the power block or electrical outfit. Before we begin, it is important to note that this type of battery may damage your device. So, only use it if you accept the risk. Here’s what you’ll need to make your own battery out of fruit.


A dozen acidic fruits. They can be citrus, pears or apples.


A penny or a copper screw for each fruit. Pennies after 1982 will have to be sanded to expose the copper.


A zinc nail for every fruit.


Insulated copper wire.


Rubber gloves that you’ll need to prevent getting shocked.

Got everything? Here’s how to make your own battery out of fruit.

Step 1: Insert a zinc nail into a fruit ensuring you leave a bit of the nail exposed to connect the wire to.

Step 2: Next, insert the copper screw into the fruit. You’ll need to place it near the zinc nail but make sure they don’t touch. If you are using citrus fruits, make sure the objects are placed in the same segment of the fruit. Repeat the process with all the fruits, making sure the zinc nail and the copper screw don’t touch.

Step 3: Connect the fruits with the copper wire. You should connect a wire from the copper piece of one fruit to the zinc piece of another and so on until all fruits are connected.

Step 4: Now cut open your USB charging cable to expose the wires inside the cable. Connect the wires to the end of the copper wire connecting the fruits.

Step 5: Now connect the USB cable to your iPhone. Each piece of fruit will produce about half a volt which should produce about 5 volts to charge your device.


Tip: What to Do If Lost Data from iPhone Unexpectedly

Sometimes you can lose some of the data on your device due to unexpected things. If you are not sure whether you’ve lost some of the data on your device, you can use iMyFone D-Back’s free trial to check (iOS 12 supported).
Why Your Lost Data Can Be Recovered?

You are able to recover temporarily lost data for a very simple reason. The iPhone saves data on a database called SQLite. When you delete data, the location the database change from “Allocated” to “Unallocated.” But this doesn’t delete the data. When you add new data to the device, it occupies the “Unallocated” entries first, thereby overwriting the data there. Third-party software can access the iOS SQLite database and recover the deleted data as long as it hasn’t been overwritten.
Steps on How to Recover Unexpectedly Lost Data from iPhone

Sponsor ads:

Gihosoft Free iPhone Data Recovery:https://www.gihosoft.com/iphone-data-recovery-free.html

Gihosoft iPhone Data Recovery Free

Free iPhone Data Recovery Software for Windows/Mac

Recover up to 12+ types of files, including contacts, SMS, photos, WhatsApp, Viber, notes, etc.

Restore lost data from iOS devices directly or from iTunes and iCloud backup

Recover iPhone data lost due to iOS upgrade/jailbreak, accidental deletion, device lost or broken

Support all the latest iPhone, iPad and iPod Touch

Both Free and Pro version.

If you lost data after you updated to a new iPhone, you can always use Gihosoft iPhone Data Recovery to get the data back from the old iPhone or backup.You may also like: iphonerecovery.com

If you use android phones, please choose Gihosoft Android Data Recovery.

With Gihosoft Android Data Recovery, no longer afraid of data loss!

Must read:Youtube video downloader for pc

Gihosoft RePicvid Free Photo Recovery Software provides a free photo recovery software for windows to help users recover the deleted or lost photo for free.

Jihosoft Android Data Recovery: the best Android Data Recovery software for Windows and Mac to recover deleted contacts, messages, photos, videos, WhatsApp and etc from Android devices.Tips:How to transfer messages from iPhone to iPhone


jihosoft Free iPhone Data Recovery

Restore WhatsApp from iCloud


1. Restore WhatsApp from iCloud

You can restore WhatsApp from iCloud if you have enabled the Auto Backup option before uninstalling the app. This is because, WhatsApp brings a feature of backing up WhatsApp chat to iCloud automatically so that whenever you will delete the app for any reason, you chat will be saved and you won’t suffer from any loss. Here is how to enable the feature: open "WhatsApp" and go to "Settings" > "Chats" > "Chats Backup" and turn "Auto Backup" on. You can choose to backup daily, weekly, or monthly.
Sponsor ads:iPhone/iPad Keeps Restarting? Here’s the Fix!


After you uninstall WhatsApp and then reinstall it from the App Store. Go along the number verifying process and install it completely. As soon as you will get completed with this, you will come up with the option of "Restore Chat History". Just tap on it and the restoring process will begin. Within a while, your deleted data will be recovered and back to you. Please note if you give up to restore this time, you will not able to restore later.Also Read:15 Exhentai proxy sites


Sponsor ads:

Gihosoft Free iPhone Data Recovery:https://www.gihosoft.com/iphone-data-recovery-free.html

Gihosoft iPhone Data Recovery Free

Free iPhone Data Recovery Software for Windows/Mac

Recover up to 12+ types of files, including contacts, SMS, photos, WhatsApp, Viber, notes, etc.

Restore lost data from iOS devices directly or from iTunes and iCloud backup

Recover iPhone data lost due to iOS upgrade/jailbreak, accidental deletion, device lost or broken

Support all the latest iPhone, iPad and iPod Touch

Both Free and Pro version.

If you lost data after you updated to a new iPhone, you can always use Gihosoft iPhone Data Recovery to get the data back from the old iPhone or backup.You may also like: iphonerecovery.com

If you use android phones, please choose Gihosoft Android Data Recovery.

With Gihosoft Android Data Recovery, no longer afraid of data loss!

Must read:Youtube video downloader for pc

Gihosoft RePicvid Free Photo Recovery Software provides a free photo recovery software for windows to help users recover the deleted or lost photo for free.

Jihosoft Android Data Recovery: the best Android Data Recovery software for Windows and Mac to recover deleted contacts, messages, photos, videos, WhatsApp and etc from Android devices.Tips:How to transfer messages from iPhone to iPhone


jihosoft Free iPhone Data Recovery

How to Access iPhone Photos on PC


1 Access iPhone Pictures on PC via Windows Explorer

You can also use Windows Explorer on your Windows (10/8/7) and utilize its built-in features to access your iPhone photos.


Follow these instructions:


First, install iTunes on your computer to resolve any compatibility issues.

Sponsor ads:7 Best iPhone Photo Editor Apps To Achieve Filter and Psychedelic Look
Connect your iPhone to your Windows PC.


Now open Windows Explorer and click on This PC.


You will see your iPhone as one of the connected devices. Double-click on it and navigate to the DCIM folder.


Select all the photos available in that folder and use right click to Copy them.


Now navigate to your desired folder on your computer and right click and select Paste. Your selected photos will be transferred to your PC.
2 Access Photos from iPhone on PC with Microsoft Photos APP

Microsoft Photos is a built-in Windows 10 software. You can use it to access your iPhone photos and transfer them to your PC pretty conveniently.


Follow these instructions:


Install iTunes to make sure that there are no compatibility issues and your iPhone gets detected by your Windows PC.


Plug in your iPhone via USB cable to your PC.


Launch Microsoft Photos app on your computer.


Now click on Import option and select your iPhone photos you wish to transfer.


Click on Continue to start the photos transfer process.
4 Access iPhone Photos on PC Using AutoPlay

AutoPlay is one of the features of Windows 7,8,10 that offers the convenience to access useful options quickly whenever you connect a storage device to your computer. You can use it to access your iPhone photos and then transfer them to your desired folder on your computer.


Follow these instructions to transfer your iPhone photos to your PC using AutoPlay:


First, make sure you have iTunes installed on your computer so that your iPhone gets detected without any issues.Sponsor ads:Best Torrent Search Engine Sites to Find Your Favorite Torrents


Connect your iPhone to your Windows PC using a compatible USB cable.


If a notification prompts asking you to Trust your connected device, do it. Once you do that, the AutoPlay window will appear.


Now click on Import Pictures and Videos option from AutoPlay window and then navigate to the DCIM folder. There, you will see subfolders and your iPhone photos within them.


Copy them via right-click to copy feature of Windows and then Paste them in your desired folder on your computer’s hard drive. Your iPhone photos will start transferring to your PC.

Monday, February 25, 2019

How to Setup or Disable HEIF Image Format on iPhone


How to Setup or Disable HEIF Image Format on iPhone

If you need to setup or disable the HEIF file format on your Apple device, simply go to your Settings on your device, locate Camera Settings and then tap on Format. To configure your device to store images in the HEIF file format simply select the High-Efficiency option. However, if you prefer the traditional JPEG file format, tap on the Most Compatible option.


Features of the HEIF Format


Media data is encoded using the High-Efficiency Video Coding (HEVC) standard.


Supports better storage of cinema graphs and image bursts.


Compatible with both lossless and lossy image data storage.


A much preferred method to share still images, related metadata and image collections.


Storage is built on the widely accepted ISO Base Media File Format (ISOBMFF).


Very compatible with computational photography.


Supports the storage of exposure and foal stacks in the same container file.
Limitations of the HEIF File Format


Other than on Apple devices, the HEIF format is still largely unsupported by many other devices.


HEIF file formats will actually take up more space when transferred to a Computer; the computer would change the file format to JPEG.


Older devices do not support the HEIF file format.Sponsor ads:File sharing sites


Sponsor ads:Best 7 Music Players for PC Free Download 2019

Must Read:If you lost data after you updated to a new iPhone, you can always use Gihosoft iPhone Data Recovery to get the data back from the old iPhone or backup.


Gihosoft Free iPhone Data Recovery:iphonerecovery.com


If you use android phones, please choose Gihosoft Android Data Recovery


Sponsor ads:emoji font 3 apk

Monday, February 18, 2019

iPhone Privacy Settings: What Should We Know in 2019?

iPhone Privacy Settings: What Should We Know in 2019

iPhone privacy setting is that feature what makes the iPhone stand out from all of other similar smartphones. We all know the recent drama between Apple and FBI about the iPhone of the terrorist that was one of the main suspects in the terroist attacks. iPhone privacy settings were all over the news, because Apple and its CEO forbid the FBI to be able to enter the phone of the “terrorist”. Now let’s talk more about these settings and let’s see what they mean and how you can make use of them! Every user should be aware about iPhone privacy settings because they may protect you against many harmful situations.Also Read:15 Exhentai proxy sites
iPhone Privacy Settings: What Should We Know?

iPhone Privacy settings is where actually your data is controlled. Not only the data and situations when your iPhone gets stolen and you need to protect that data, but also other important settings like permissions. If you want to know to access it, it is very simple. Go to “Settings”, then tap "Privacy” and you are all set. There you will find all sorts of different Privacy Settings features.

(1) Basic Privacy Settings

Privacy settings on iPhone help differently when they are turned on and off. When all of the basic privacy settings are turned on, your iPhone is protected against theft, losing and your GPS/location can be used by some of the apps. To put it simple, when the privacy is on for most of the cases the iPhone will block any app that is trying to get some information from your iPhone. Contrary when Privacy Settings are off, the apps can drain battery, get data and do actions that you didn’t approve. So, be sure to frequently visit this and manage your basic privacy setting apps. Just leave the important settings on and let the unnecessary ones off.

(2) Location Services

Location services are the GPS features of your iPhone that let you find out where exactly you are, find nearby services, get directions, etc. They brings great convenience sometimes, but they also makes you suffer the risk of being tracked. When you visit the privacy settings tab you will most likely notice the location services as well. Location service are ON by default.


Location Services: Turn off this one would not give any permission for other items below to be turned on. You can turn it ON.


Share My Location: With it ON, you can send your GPS location to family members who you have added into your Family Sharing.


Apps: For each app listed there, you have two choice, “Never” and “While Using the App”. Not all apps need your location and you don’t want all apps to know where you are. Choosing “Never” for those apps which you do not want them knowing where you are at all.

(3) System Services

Cell Network Search: It helps you to find 3G or 4G cellular network to connect.

Compass Calibration: It focuses on using of built-in compass for location.

Find My iPhone: It allows Find My iPhone to use GPS to find the location of your lost iDevice.

HomeKit: It allows you to turn 3rd party accessories on or off when you at home or not.

Location-Based alerts: It allows your iPhone to receive alerts and notification based on where you are.

Location-Based iAds: It allows apps to use your location for delivering ads.

Motion Calibration & Distance: It will allows your device tracking your fitness activities.

Safari & Spotlight Suggestion: It allows Safari and Spotlight to provide you with relevant information based on where you are.

Settings Time Zone: It allows your iPhone’s time zone to be updated automatically.

Share My Location: It is helpful when one needs the directions to another.

Wi-Fi Networking: It will send information about nearby Wi-Fi networks to Apple, which would help Apple to improve its features.

Frequent Locations: It allows your iPhone to learn placed you frequently visit in order to provide useful location-related information.Bonus Tips:
Restoring Lost Photos and Videos from iPhone

If you have deleted some of your pictures or videos from your gallery, then there is a straightforward way to Recover Deleted Files iPhone back.

After you delete the media files from your gallery, be it photos or videos, then you must know that iOS has a feature that the deleted media files doesn’t get deleted immediately, but it gets compiled to a temporary folder from where it gets deleted after 30 days. If you lost data after you updated to a new iPhone, you can always use Gihosoft iPhone Data Recovery to get the data back from the old iPhone or backup. Should you wish to recover these files, you must go to that “recently deleted” folder and retrieve these files before 30 days.

If you use android phones, please choose Gihosoft Android Data Recovery.

Worth reading:Best youtube downloader online download youtube 1080p

Must Read:

How to transfer messages from iPhone to iPhone

Must read:icloud activation lock removal

Must read:Gihosoft Free iPhone Data Recovery:https://www.gihosoft.com/iphone-data-recovery-free.html


Note

Using iPhone privacy settings would bring you much convenience for your life, but would also make you suffer the risk of privacy leak. Your iPhone data may be tracked. But when you turn iPhone privacy settings off, lots of useful iPhone features cannot be used. So please keep some settings you need on and turn others off. Besides, you can also completely delete your unneeded personal data from your iPhone.

Thursday, February 14, 2019

How to Manage Photos on iPhone 2019


How to Manage Photos on iPhone
1 Delete Photos

The best thing that you can do to manage photos on your iPhone is to simply delete them.


Launch Photos apps on your iPhone. Photos will be displayed according to Years > Collections > Moments. Head into Moments.


Hit “Select” button at the top right corner and check unwanted photos, and tab “Trash” icon at the bottom right corner to delete them.


The deleted photos will be added into trash folder called “Recently Deleted”. If you want to totally remove them, go to “Albums” tab at the bottom and hit “Recently Deleted” album. Tab “Select” button at the top right corner and choose “ Delete All” at the bottom left corner.


2 Compress Photos

Sometimes, though, you want to just manipulate a photo and change the size of it via compression. That’s fine.


Head into Photos on your iPhone. Select some photos and hit “Action” button at the bottom left corner, and tab “Mail”.


It will turn to “Mail” app. Fill in “To” and “Subject”. Tab “Send” button at the top right corner.


Choose the size hat suits what you need most. Compressed photos will be send to your email.


Note

At most 5 photos can be compressed at the same time. If you just want to keep the compressed photos on your iPhone, you can download the ones from email and delete the original ones. I suppose you may think it is not easy to do so. However, there is another way to compress photos easily below.
3 Transfer Photos to PC

The third option that you can turn to easily manage photos on iPhone , though, comes from backing up photos to computer.


Simply connect your iPhone to PC, and “Autoplay” windows will pop up.


Select “Import Pictures and Videos” option.


Browse through your files to select photos. Then tab “Import” option to transfer photos to your PC.


Sponsor ads:

Gihosoft Free iPhone Data Recovery:https://www.gihosoft.com/iphone-data-recovery-free.html

Gihosoft iPhone Data Recovery Free

Free iPhone Data Recovery Software for Windows/Mac

Recover up to 12+ types of files, including contacts, SMS, photos, WhatsApp, Viber, notes, etc.

Restore lost data from iOS devices directly or from iTunes and iCloud backup

Recover iPhone data lost due to iOS upgrade/jailbreak, accidental deletion, device lost or broken

Support all the latest iPhone, iPad and iPod Touch

Both Free and Pro version.

If you lost data after you updated to a new iPhone, you can always use Gihosoft iPhone Data Recovery to get the data back from the old iPhone or backup.You may also like: iphonerecovery.com

If you use android phones, please choose Gihosoft Android Data Recovery.

With Gihosoft Android Data Recovery, no longer afraid of data loss!

Must read:Youtube video downloader for pc

Gihosoft RePicvid Free Photo Recovery Software provides a free photo recovery software for windows to help users recover the deleted or lost photo for free.

Jihosoft Android Data Recovery: the best Android Data Recovery software for Windows and Mac to recover deleted contacts, messages, photos, videos, WhatsApp and etc from Android devices.Tips:How to transfer messages from iPhone to iPhone


jihosoft Free iPhone Data Recovery

Tuesday, January 29, 2019

How to Find and Recover Email Password on iPhone 2019


How to Find and Recover Email Password on iPhone

If you have the question “how to recover my email password?”, this section of the article will help you out. We already know that your email passwords are saved in “Keychain” and it is all about on how to recover it.
Option 1. Find Accounts and Passwords on iPhone

Step 1. Open the “Settings” app on your iPhone.

Step 2. Scroll the screen down and tap on the option “Passwords & Accounts”.

Step 3. Go to Website & App Passwords.

Step 4. Authenticate the process either through Face ID or Touch ID.

Step 5. Once you have found a way in to the accounts and passwords, you can see a range of entries. If you tap on an entry, it will display details such as the username and password and the respective website. To copy username and password, you can tap and hold on them.


Option 2. Find Accounts and Passwords on Other iOS Devices

If you have enabled iCloud Keychain as a Mac or an iOS user, finding accounts and related password that are used on the devices is easy. Here are the steps you can follow when it comes to a Mac (on OS X Mavericks 10.9 or later).

Step 1. Go to Safari and select Preferences. Then, go to Passwords.

Step 2. Select the website on which your password is used.

Step 3. Select the option “Show Passwords”.

Step 4. Enter the password of your Mac.


If you have turned iCloud Keychain and used the passwords on an email website visited through Safari, here’s what you should do.

Step 1. Go to “Safari” located under “Settings” app.

Step 2. Go to “General” section and select “Autofill”.

Step 3. Tap on the option “Saved Passwords”.

Step 4. Tap on any website and enter the passcode of the device to see the passwords and accounts.


Option 3. Recover Email Passwords from iPhone Directly

As of now, you don’t get many software to recover email passwords, so you must not rely on random tools. However, you shouldn’t give up hopes as iMyFone is working hard on this which will be released soon.

Step 1: Run this software on PC or Mac and then click Start button.

Step 2: Then connect your device to computer successfully to start scanning.

Step 3: after scanning, all saved passwords will be listed and you can export them now.
Tip: Reset Email Passwords on Corresponding Websites

Here’s how to reset email passwords of the websites you usually work with.
Google

Step 1. Go to Forgot password option.

Step 2. Type the full Gmail address and click on “Next”.

Step 3. Answer the questions asked by Google.

Step 4. Follow the change password link and reset the password.


Outlook

Step 1. Select the page “Reset your password”. Define why you need to reset the password and hit “Next”.

Step 2. Enter the email address you intend to recover and type in the characters you will see on the screen and hit “Next”.

Step 3. Enter the one-time password you get on the phone.

Step 4. Change the password.


Yahoo

Step 1. Go to the Sign-in Helper and type one of the account recovery items listed.

Step 2. Click Continue and follow the instructions given on screen.


Conclusion

Recovering a lost email password can be pretty straightforward task if the Keychain is activated. Otherwise, you need to reset a forgotten password through the official support services associated with respective email services. If you want to recover a lost email password, just wait patiently. Leave us a comment below if you need any other technical assistance.

Sponsor ads:

Gihosoft Free iPhone Data Recovery:iphonerecovery.com

Free iPhone Data Recovery Software for Windows/Mac

Recover up to 12+ types of files, including contacts, SMS, photos, WhatsApp, Viber, notes, etc.

Restore lost data from iOS devices directly or from iTunes and iCloud backup

Recover iPhone data lost due to iOS upgrade/jailbreak, accidental deletion, device lost or broken

Support all the latest iPhone, iPad and iPod Touch

Both Free and Pro version.

If you lost data after you updated to a new iPhone, you can always use Gihosoft iPhone Data Recovery to get the data back from the old iPhone or backup.

Top 10 Best FRP Bypass Tools to Bypass Google Account on Android Device 2019

Worth reading:download youtube 1080p

Jihosoft Android Data Recovery: the best Android Data Recovery software for Windows and Mac to recover deleted contacts, messages, photos, videos, WhatsApp and etc from Android


If you use android phones, please choose Gihosoft Android Data Recovery

Best iPhone 11 and iPhone 11 Pro Deals

It is rare to find good deals on new iPhones due to the initial rush. With the iPhone 11 and iPhone 11 Pro though, things are a bit differe...