How to Transfer Music from iPhone to Computer via iTunes?
To transfer songs from iPhone to computer, you can turn to an official tool called iTunes as well. This program is provided to help users sync or backup their iPhone, iPad or iPod data easily.
Pros
- The tool is 100% safe;
- The operation is easy.
Cons:
- It only allows you to download the purchased songs to computer.
The following is the tutorial about how to transfer songs from iPhone to PC via iTunes:
Step 1. Launch the latest iTunes on your computer and then connect your iPhone devices to computer or Mac via its USB cable.
Step 2. Tap on the "File" option at the upper left corner of iTunes and continue to choose "Devices". Next, you need to select the option "Transfer Purchases" from your iPhone name.
Step 3. Now you need to wait till the transferring process ends. Then you can click "Recently Added" at the left side of iTunes and elect the purchased music that you want to save. Finally, you should click "Download" to start downloading the selected songs to your computer.
Other Ways to Transfer Songs from iPhone to PC
Using iPhone transfer software and iTunes are two common ways to transfer iPhone music to computer. But except for that, you are able to user other ways to sync the data as well. For instance, you can make use of cloud storage service or email to complete the transfer easily.
- Cloud storage service: Users just need to install the application like Dropbox, Google Drive, etc. on your iPhone and then sync the wanted files to the service. After that, you can login to the cloud on your computer and then download them to the desktop with ease.
- Email: You can send the wanted songs to an email by using the application Song2Email and then download the received folder to your computer.
Notice: The application Song2Email is not free. You need to pay for the service if you want to email the music with the app.
How to Transfer Music from Computer to iPhone X/8/7/6S/6
After backing up music to local disk by following the steps above, you'll find transferring music from computer to iPhone is quite simple here. If you haven't done these steps before, it also doesn't matter. Just go with the below steps to reach your goal with iTunes. Or you can read the page of how to transfer music to iPhone X/8/8 Plus to find the complete guide of importing music.
Step 1. Please be sure all your needed music have been saved on the Windows or Mac computer. If the file is saved in your iPhone or iPod device, you can follow the steps in Part 1 or Part 2 to export them to computer easily.
Step 2. Next, you need to sync all your beloved songs to iTunes and then connect your iPhone device to the computer and make sure it is recognized by the iTunes.
Step 3. Finally, click the device under that tab of "DEVICES" in the left panel. And then you can select "Music" option in the right window. Here, you can see a category of "Sync Music". Just check it and select "Entire music library" or "Selected playlists, artists and genres" according to your own needs. After that, you can click "Apply" button to save all the settings.
Final Thought
That's all for how to transfer music from iPhone to computer. Just choose one software to transfer the wanted songs for backup so that you can get them back while accidentally losing them. Although there are other tools available for you to retrieve the iPhone music without backup, you are unable to recover all kinds of data with these tools. So to better protect your phone data, you'd better make a backup beforehand.
You may also like:Gihosoft Mobile Transfer: 1 Click Data Transfer from Phone to Phone
Gihosoft Android data recovery Free is a super awesome software specialized in Android file recovery. With this program, you are able to recover deleted photos, music, videos, messages, contacts, call logs, WhatsApp messages, Viber chat history and more from Samsung, Huawei, LG, HTC, Motorola, Google, Oneplus, Sony, Lenovo, ZTE and other Android devices directly. Meanwhile, this Android data recovery software is available for both Windows and Mac platforms.For now, check:Free iTunes/iPhone Backup Extractor for iPhone, iPad
Jihosoft iTunes Backup Extractor free is a powerful tool to recover and extract important data from iPhone, iPad & iPod touch backup on Windows or Mac.
If you can’t sync with iTunes and want to rescue data from a disable iPhone, you could try Gihosoft iPhone Data Recovery. Also feel free to ask questions on the iDevice is disabled error in the comments section below.
Monday, September 3, 2018
Thursday, August 30, 2018
5 Tips to Fix “iPhone Won’t Stay Connected to WiFi” 2019
5 Tips to Fix “iPhone Won’t Stay Connected to WiFi”
How to Fix “iPhone Won’t Stay Connected to WiFi”

1. Try Another Device
Probably you've tried this as the beginning step when your iPhone won't stay connected to WiFi. But if you haven't, we recommend you to try connecting the WiFi with any other device. If the other phone is also popping up the same trouble, then you should restart the router of your home. Alternatively, simply switch to another WiFi connection. In case, the other device shows no such problem and connecting successfully, then your iPhone has to go under the treatment. Look for the next tip to get the problem solved.
2. Disable WiFi and then Restart Your iPhone
You can, for no other reason, turn off the WiFi and give your iPhone a restart phase. Disabling the connection for a while and keeping the device stable will likely to make the troubling functions settled and turn your device to act normal. Also, when you restart your device, make sure to turn the WiFi back on. Now check if the problem still arises.

3. Reset Network Settings
If the situation is still same and iPhone won't stay connected to WiFi for a long time, try resetting network settings now. As the name hints itself, it will take your all network settings to a fresh start. Please note that this method will delete your entire networks and passwords. The steps are as goes:
Begin with opening 'Settings' and then tap on 'General'.
Go to 'Reset' and complete the process by hitting on the 'Reset Network Settings'.
When you do this, you may be asked to enter the passcode. Do it and confirm resetting.

4. Turn off Bluetooth
Another thing you need to try if your iPhone won't stay connected to WiFi is disabling the Bluetooth. This is because the Bluetooth is able to cause some interference and inconvenience with the connection between your WiFi and device. Therefore, to prevent this situation, go to 'Settings' and tap 'Bluetooth' and turn it off. Now use your WiFi and check if the device keeps connected to it or not.

5. Restore iPhone to Factory Settings
Here is the last fix to try when your iPhone won't stay connected to WiFi. There could be some unknown reason with the other apps or data on your device that is causing iPhone not keeping connected to WiFi, so you need to restore your iPhone to factory settings. This process will take help of iTunes. All the data on your device will be erased. The steps are given just below.
As the first move, connect your device to the PC and open iTunes in it.
Upon successful connection of iPhone and PC, you need to click on the device icon at the top followed by 'Summary' tab.
Now, choose the option 'Restore iPhone' and confirm the process.

Gihosoft Android data recovery Free is a super awesome software specialized in Android file recovery. With this program, you are able to recover deleted photos, music, videos, messages, contacts, call logs, WhatsApp messages, Viber chat history and more from Samsung, Huawei, LG, HTC, Motorola, Google, Oneplus, Sony, Lenovo, ZTE and other Android devices directly. Meanwhile, this Android data recovery software is available for both Windows and Mac platforms.For now, check:Free iTunes/iPhone Backup Extractor for iPhone, iPad
Jihosoft iTunes Backup Extractor free is a powerful tool to recover and extract important data from iPhone, iPad & iPod touch backup on Windows or Mac.
You may also like:Gihosoft Mobile Transfer: 1 Click Data Transfer from Phone to Phone
If you can’t sync with iTunes and want to rescue data from a disable iPhone, you could try Gihosoft iPhone Data Recovery. Also feel free to ask questions on the iDevice is disabled error in the comments section below.
Friday, August 10, 2018
How to Fix iPhone Cannot Connect to Bluetooth
How to Fix iPhone Cannot Connect to Bluetooth
1. Check the Basics for Bluetooth Connection
There are basic things that you need to check first when you want to know if your Bluetooth is connected to your iPhone.
First, check if your iPhone’s Bluetooth is turned on by swiping up from the bottom of your iPhone screen then opening the Control center. Click on the Bluetooth icon. Make sure it is blue meaning it is on but if it is grey it is off.
Secondly, keep your Bluetooth device closest to your iPhone as the proximity and range of Bluetooth devices is around 30 feet for the devices to be able to connect properly. If the devices are beyond that range you will most likely have iPhone cannot connect to Bluetooth problems.
2. Check Where the Problem Lies
When you find that your iPhone cannot connect to Bluetooth it could either be because there is something wrong with your iPhone or your Bluetooth device. It is important to know which device has a problem so that it can be fixed. You can take another Bluetooth device and try connecting to your devices to see which one successfully connects with your iPhone.
If your iPhone cannot connect to Bluetooth devices this means your iPhone has a problem, but if one of the Bluetooth devices connects to your iPhone, this means one of the Bluetooth devices has a problem.
3. Turn Off and Turn On Bluetooth
By turning your Bluetooth off and on again you can fix some minor software glitches that may prevent your iPhone and Bluetooth devices from connecting properly. There are three ways of doing this.
Going to the Settings app and turning Bluetooth off.
Go to your iPhone and open Settings.
Click on the Bluetooth icon.
Turn off the Bluetooth switch. It will turn grey when off.
Click on the Bluetooth switch again to turn it on. It will turn green.

Go to the Control center and turn Bluetooth off.
To open the Control center swipe up from the bottom of your iPhone screen.
Click on the Bluetooth icon and turn it off. The icon will turn black inside a grey circle.
Click again on the Bluetooth icon and turn it on. The icon will be white inside a blue circle.

Using Siri turn Bluetooth off.
Press and hold the Home button to turn on Siri on your iPhone or say, “Hey Siri”.
Turn off Bluetooth by saying, “Turn off Bluetooth”.
Turn on Bluetooth again by saying, “Turn on Bluetooth”.
After you have turned Bluetooth off and on again, try pairing your iPhone and Bluetooth device to find out if the problem has been fixed.
4. Hard Reset iPhone
You can try hard resetting to flash out any hard bits that are stuck in your device. Follow these steps:
To open the Control center on your iPhone swipe up from the bottom of your device.
Click on the Bluetooth icon to turn it off.
If you are using iPhone 7 and newer, press and hold the Sleep/Wake and Volume down buttons simultaneously. On iPhone 6s and older, press and hold the Sleep/Wake and Home buttons simultaneously.
Keep holding till you see the Apple logo appear then release the buttons.
Wait for your iPhone to reboot.
Access the Control center by swiping up from your iPhone’s screen.
Click on the Bluetooth icon to turn it back on. Then try connecting your iPhone and Bluetooth device.

5. Forget the Device
Forgetting the Bluetooth device means it will be like the Bluetooth device was never connected to your iPhone so when you connect the devices it will be doing it for the first time. These are the steps to follow:
Go to your iPhone Settings.
Click on the Bluetooth icon.
Click on the (i) symbol next to the Bluetooth device you want to forget.
Click on Forget this device then click on it again when prompted.
The forgotten device will not appear in My device Settings or in Bluetooth. Put the Bluetooth device on pairing mode to reconnect it with your iPhone.

6. Reset Network Settings
This is a way of fixing more complicated software problems by erasing all data settings from Wi-Fi and VPN, Bluetooth devices and iPhone so that your iPhone and Bluetooth device can connect from clean settings. Make sure you can remember all your Wi-Fi passwords before resetting the network settings as you will use them later.
Open your iPhone Settings then click on the General tab.
Scroll down and click on the Reset button.
Click on Reset network settings.
If prompted enter the passcode.
After the reset is done your iPhone will restart itself. Try pairing your Bluetooth device with your iPhone again.

If you lost videos from iOS Camerall Roll which are nowhere to download again, you can use Gihosoft iPhone Data Recovery to get back deleted videos from iOS device including iPhone, iPad and iPod Touch.
Jihosoft Android Data Recovery: the best Android Data Recovery software for Windows and Mac to recover deleted contacts, messages, photos, videos, WhatsApp and etc from Android devices.
Any app suggestions or topic recommendations are appreciated in the comments down below.
Wednesday, August 1, 2018
How to Convert HEIC Photos to JPEG Format
How to Convert HEIC Photos to JPEG Format
Automatically Convert HEIF Images into JPG When Transfering to Mac or PC
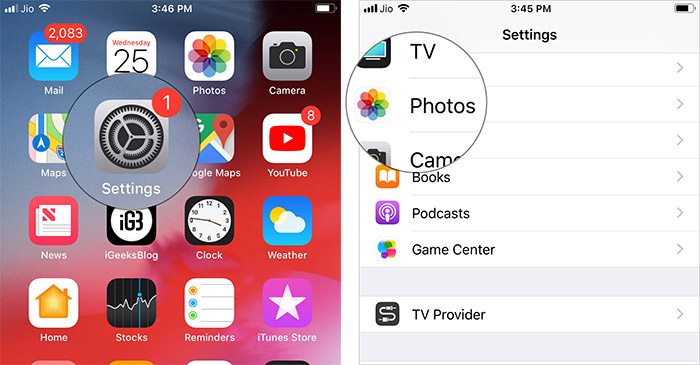
Both iOS 11 and 12 automatically convert HEIC to JPG when transferring the images to Mac or PC. So, if you ever faced the incompatibility hurdle, take advantage of this built-in option.
Step #1. Launch the Settings app on your iOS device → Photos.
How to Convert HEIC Images into JPEG Right on the iPhone and iPad
What if you don’t take the root mentioned above and wish to get it done right on your iOS device? It turns out, there is a trick to get it done!
Step #1. Once you have captured the HEIF image, open Photos app on your iOS device and head over to the pic.
Step #2. Now, tap on Edit and then use any tool like cropping, rotating or filter.

Tap on Edit and then use any tool like cropping, rotating or filter in iPhone Photos App

Step #3. Next, tap on Done to confirm.
Tap on Done to Convert HEIC Image into JPEG on iPhone
That’s it!
Check out the image has been converted to JPG. You can now use it with the software that doesn’t support HEIC.
Sponsor Ads:
Gihosoft Free iPhone Data Recovery is a professional iPhone Data Recovery software to get back all your lost text message, photo, video, call history, note, contact and more from iPhone/iPad/iPod Touch. It offers a full solution to recover your lost data in different tough situations. Besides recovering data directly from iPhone, iPad and iPod touch, it also allows you to recover data from iCloud and iTunes backup files.
iPhone backup unlocker:Recover iTunes Backup Password.
iPhone backup extractor free:The best iPhone Backup Extractor software to extract photos, text messages, contacts, voice memos, note, WhatsApp, Viber and etc from iPhone/iPad backup.
Monday, July 30, 2018
Fix iTunes “Back Up Now” Not Working/Greyed out after Mac OS Upgrade
Fix iTunes “Back Up Now” Not Working/Greyed out after Mac OS Upgrade
From this point onwards, let’s take a look at how to fix “iTunes backup now greyed out Mac” issue. Instead of one method, we present top easy methods to fix the said issue.
1Update iTunes to the Latest Version on Mac
Generally, iTunes notifies you in the event of a release of a new version. You can simply click in the popup menu and follow the onscreen instructions to get it done. However, if the notification doesn’t appear and you still want to update iTunes on your mac to fix “iTunes backup not working” issue, you should follow these steps.
Go to App Store.
Go to the “Updates” tab. Select “Software Updates” and click on “More”.
Locate the button called “Update” next to iTunes.
The new version will be updated automatically.
Launch iTunes to try the newest version.

2Restart Both of Your iOS Device and Mac
If the problem doesn’t work even after an update, you should try restarting both the iOS device and Mac to fix “iTunes backup greyed out” issue. Here’s how to do it.
To restart your iPhone X
Hold the Side button with a volume button to get the slider appeared.
Drag it to turn off the phone.
Press and hold the Side button to start the device again.

To restart iPhone 8 or older devices (including iPads)
Hold the top or side button to get the slider appeared.
Drag it to turn off the device.
Press and hold the side or top button to start the device.

To restart Mac
Hit Apple key and click on Restart option to restart your Mac.

3Change a Workable USB Cable
Sometimes the “iTunes backup now greyed out mac” can occur due to a bad USB cable. In this case, you should replace the USB cable with a new one and give it a try. If the problem persists, you should connect the USB cable into different ports.

4Update Apps on Your iPhone
Sometimes, outdated apps can be the reason behind “no backup option in iTunes” issue. In this case, you have to fix it by updating the apps.
Go to iPhone’s App Store icon.
Tap the Updates icon.
Select “Update All”.
Enter password when prompted.

5Make Sure There’s Enough Space On Your Mac
iTunes backup will not work if you Mac doesn’t have enough space. To check the space, you should:
Go to Apple Menu and select “About This Mac” option.
Select “More Info”.
Click “Storage” to see the available space.

6Check Your Mac’s Security Software
If the security software blocks iTunes, it will not permit to backup. To check it, you should:
Go to System Preferences.iPhone backup unlocker:Recover iTunes Backup Password.
Security (or Security & Privacy) icon.
Go to the Firewall tab and check if iTunes is blocked.

7Delete Corrupted Old iTunes Backups on Mac
A corrupted iTunes backup can cause problems and prevent you from backing up iTunes. Here’s how to delete it and fix it.
Go to iTunes and select “Devices” under “Preferences”.
Under Device Backups, you will find the old backup.
Click on it and delete it.

8 Delete the iTunes Preferences File on Mac
If you have changed the iTunes preferences on the Mac, you will experience some issues in creating backups. You can fix this issue simply by deleting the iTunes preference file. To do this, you should:iPhone backup extractor free:The best iPhone Backup Extractor software to extract photos, text messages, contacts, voice memos, note, WhatsApp, Viber and etc from iPhone/iPad backup.
Sponsor ads:
Gihosoft Free iPhone Data Recovery:iphonerecovery.com
Free iPhone Data Recovery Software for Windows/Mac
Recover up to 12+ types of files, including contacts, SMS, photos, WhatsApp, Viber, notes, etc.
Restore lost data from iOS devices directly or from iTunes and iCloud backup
Recover iPhone data lost due to iOS upgrade/jailbreak, accidental deletion, device lost or broken
Support all the latest iPhone, iPad and iPod Touch
Both Free and Pro version.
If you lost data after you updated to a new iPhone, you can always use Gihosoft iPhone Data Recovery to get the data back from the old iPhone or backup.
Worth reading:download youtube 1080p
Top 10 Best FRP Bypass Tools to Bypass Google Account on Android Device 2019
Go to Finder.
Press Alt/Option and click on Go.
Go to “Preferences” under “Library”.
Locate com.apple.iTunes.plist file and delete it.
Restart to finish the process.

Friday, July 27, 2018
Best 5 Apps For Mac Backup 2018-2019
Best 5 Apps For Mac Backup 2018-2019

If you needed an extra boost, Apple just made it a bit more difficult to recover lost data on new MacBook Pro models. Do not rely on Apple to save you if you have not saved your Mac. AppleInsider talks about how to do this, with options beyond Time Machine.
Best 5 Apps For Mac Backup List
- Shield
- Time Machine
- SuperDuper!
- Carbon copy cloner
- ChronoSync
Shield
When you put it like that, a quick and easy backup seems a bit dull. Yet, compare and contrast. People who complain this week that Apple has removed a data recovery port of the new MacBook Pro models live too close to the edge for comfort.
The use of this data recovery port was within the reach of the last resort of data hiring specialists. If this diagnostic port that most Mac users have never heard of is your only line of defense, then you are leading a colorful life, but we will never rely on you to take care of our job.
Each of these four can be used for simple tasks and each can be made more complex through your choice of options and settings. In order, the simplest to the most complex, the command is Time Machine, SuperDuper !, Carbon Copy Cloner and ChronoSync.
back to menu ↑
Time Machine
In any case, Time Machine is the easiest backup system to use. It’s even the easiest to get because it’s already waiting there on your Mac. The only additional thing you need is an external hard drive, the same as you do for all these backup systems.
When you connect a disk and format it, your Mac even prompts you to use it as a Time Machine volume. If you decide to do it, that’s about it. Your Mac will save itself regularly on this external drive.
back to menu ↑
SuperDuper!
SuperDuper! aims to make fast and painless backing – but also safe. Until you choose to dig deeper, it simply asks you what you want to copy and where you want to copy it. Then, before making a copy, it checks that you are sure that it is what you want.
If you want to copy the Documents folder on your Mac to an external hard drive you just plugged in, SuperDuper! can do it for you in the moments.
SuperDuper! 3.1.7 is available in a free version of the developer, but we recommend upgrading $ 27.95 because it adds planning features. Rather than having to remind you to save, he remembers for you.
Carbon copy cloner
Carbon Copy Cloner seems more complicated than SuperDuper! but a little more complexity comes more features.
It’s a fine line, though, with these two apps offering features that you quickly grab and others that you need to think about. The real difference between SuperDuper! and Carbon Copy Cloner comes down to personal preferences.
However, we like the way Carbon Copy Cloner makes the implementation of several backups in a row.
That’s what’s called task chaining and it’s a particularly handy addition to the application – you know exactly what backups you want when. Determine it, put it in place, move away and never think about it again. Until there is a problem or you think of something during your absence.
Carbon Copy Cloner 5 costs $ 39.99 directly from the developer and requires macOS 10.10 or later.
However, if you are interested in this wealth of multiple backups, look at ChronoSync.
back to menu ↑
ChronoSync
These four applications work to meet the needs of most users: a secure backup of your work that does not require you to continue to check or edit anything. Set them once and you’re done. Unless your job requires rigorous and flexible backup, or if your job is to save other people’s data for them, you need ChronoSync.
This is not an application that you will buy, launch and save documents in moments. It could take a good minute or two. Afterwards, you could spend your working days exploring ChronoSync’s options.
However, there is just one that could make your choice. You can control ChronoSync remotely. It requires configuration and requires various complementary applications, but you can control your Mac backup from your iPhone.
ChronoSync 4.8.7 for Mac costs $ 49.99 directly from the developer and requires macOS 10.10 or later.
If you lost videos from iOS Camerall Roll which are nowhere to download again, you can use Gihosoft iPhone Data Recovery to get back deleted videos from iOS device including iPhone, iPad and iPod Touch.
Jihosoft iPhone Backup Extractor Extract and recover all types of data from iPhone backup files, such as camera roll photos, videos, SMS, contacts, reminders, WhatsApp, and etc.
Tuesday, July 24, 2018
How to Fix WiFi Calling Not Working after iOS 12 Update?
WiFi Calling Not Working after iOS 12 Update?
How to Fix WiFi Calling Not Working after iOS 12 Update?
1. Enable Wi-Fi Calling on This Phone
If you get a new iPhone and your Wi-Fi calling not working in iOS 12, you need to re-enable your Wi-Fi calling. To check the Wi-Fi settings and re-enable the features you will need to go to your iPhone settings and click on phone then select Wi-Fi calling. If it’s not activated, tap on Wi-Fi calling to enable the feature. You will need to update and verify your emergency address if it’s your first time enabling the Wi-Fi calling feature.

2. Reset Network Settings
There are times your iPhone might be having issues with its GPS or Wi-Fi connections. This might be because your Wi-Fi calling not working in iOS 12. The only way to solve these issues is to reset the network settings on your iPhone. To successfully reset you will need to go to your phone settings click on general then tap on reset. You can then select the reset network settings. You might need to enter a passcode then confirm the whole process by clicking on the reset network settings.

3. Update Carrier Settings
In case you notice something is wrong, you need to check if any carrier updates have been released. Your device might not function properly if the carrier has released an update to upgrade the network and your device is not up to date. For you to be able to download the update, you just need to go to settings, select general then click on the about tab. You will receive a prompt on your screen asking you to install the new carrier updates. Once you are through downloading, restart your device to make sure you have installed the updates properly.

4. Update Subscriber Settings
To help your phone working again with Wi-Fi calling, you need to update the subscriber settings. This method only applies to sprint subscribers. By using the phone feature on your phone click on phone then dial ##25327# and wait for the process to begin. Your phone will lose signal for a few minutes and return. The sprint Wi-Fi logo will then appear in the status bar once the update is complete.If you lost videos from iOS Camerall Roll which are nowhere to download again, you can use Gihosoft iPhone Data Recovery to get back deleted videos from iOS device including iPhone, iPad and iPod Touch.
Jihosoft iPhone Backup Extractor Extract and recover all types of data from iPhone backup files, such as camera roll photos, videos, SMS, contacts, reminders, WhatsApp, and etc.
Gihosoft Android data recovery Free is a super awesome software specialized in Android file recovery. With this program, you are able to recover deleted photos, music, videos, messages, contacts, call logs, WhatsApp messages, Viber chat history and more from Samsung, Huawei, LG, HTC, Motorola, Google, Oneplus, Sony, Lenovo, ZTE and other Android devices directly. Meanwhile, this Android data recovery software is available for both Windows and Mac platforms.

5. Turn off Mobile Data
By turning off your phone’s data connection, your phone will be forced to use the phone’s Wi-Fi connection. There are two ways you can to turn off your phone data. In the first method you need to open the control centre then click on the network icon. Wait for a minute then click on the network icon again. In the second method go to settings, click on the cellular button then toggle the cellular data button. Take a minute then toggle the cellular data button again.

Subscribe to:
Posts (Atom)
Best iPhone 11 and iPhone 11 Pro Deals
It is rare to find good deals on new iPhones due to the initial rush. With the iPhone 11 and iPhone 11 Pro though, things are a bit differe...

-
iPhone Privacy Settings: What Should We Know in 2019 iPhone privacy setting is that feature what makes the iPhone stand out from all of ot...
-
Where Are My Ringtones in iTunes? Finding out Here! If you want to access the ringtones that you have stored on your computer, you can do...
-
It is rare to find good deals on new iPhones due to the initial rush. With the iPhone 11 and iPhone 11 Pro though, things are a bit differe...


