Saturday, July 14, 2018

Top Solutions for iCloud Connection Error 2019 Guide

Part 1: Main Reasons for iCloud Connection Error

There are some different reasons for the error connecting to Apple ID server, but here are the two most common ones.
  • Unstable internet connection. Make sure that your device is connected with a strong internet connection and that you can access other websites without any issues.
  • Changes to iTunes’ Terms and Policy. If Apple has made changes to their Terms and Policy documents, then you may have to review and accept the changes before accessing iCloud.
Regardless of the reasons for being unable to connect to iCloud, now we’ll explain some fixes to try out.

Way 1: Sign in & out of Your iCloud Account

Signing out and back into your iCloud account will refresh the connection, thus it is worth trying.
  1. Go to “Settings > [your name]” and at the bottom of this menu tap “Sign Out”.
  2. Enter your password and select the data you want to keep on your iPhone, before tapping on “Sign Out” again to confirm.
  3. Back to the default “Settings” menu, tap “Sign in to your iPhone” and enter your iCloud information.
sign-out-icloud-account

Way 2: Check & Verify Your iCloud Account Information

Verifying your iCloud account will reassure you that there’s nothing wrong with the connection. Doing so is as simple as signing into another device.Gihosoft Free iPhone Data Recovery is a completely free yet powerful data recovery software to retrieve deleted or lost data from iPhone, iPad and iPod touch.

  1. On another iOS device, sign into your iCloud account.
  2. If you sign in without any problems, your connection is fine.
icloud sign in
This quick check can rule out any local network problems and point you in the right direction.

Way 3: Check if Apple’s Servers Are Down

Checking whether or not the Apple servers are down is another quick way to find out if the problem is on your end. If you click here, you can view all of Apple’s services and whether or not there is ongoing maintenance or trouble that could prevent you from accessing the servers.
apple-system-status-screen

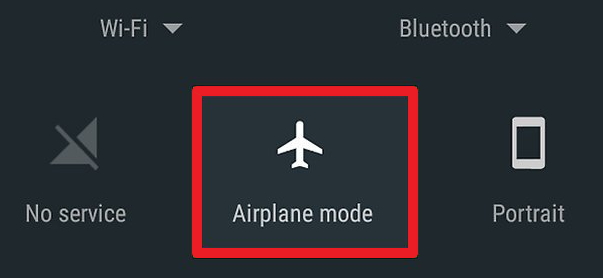
Way 4: Toggle Airplane Mode on Your iDevice

Open the “Settings” app and tap on the Airplane Mode slider. Wait a few minutes and tap on it again. By enabling Airplane mode, all of your device’s connections will be disconnected and upon disabling Airplane mode, new connections will be made.
Bonus Tips:
11 BEST IPHONE X SECRET TIPS AND TRICKS EVERYONE SHOULD KNOW 2018
1. Open the App Switcher like a pro:
  1. Swipe up from the bottom to the middle of your screen and hold until you see the App Switcher.
  2. Swipe left or right to find the app that you want to use.
  3. Tap the app.
2. Bring back the home button (sort of): Go to General > Accessibility > AssistiveTouch and turn it on. You’ll now see a virtual home button that you can customize to activate shortcuts.
3. Unlock with Face ID faster: Turn off attention detection, Face ID needs a certain set of data each time it’s used, and there’s no getting around that. Face ID needs to be able to detect your eyes, nose, and mouth. While it can detect your eyes even when they’re closed (if attention is off), you’ll need to have your nose and mouth uncovered if you plan on unlocking your iPhone X with your face.
4. Show battery percentage: To show the battery percentage in the status bar, go to Settings > Battery and turn on Battery Percentage. Swipe down from the top-right corner of the iPhone X’s display to open Control Center, and check, the battery percentage is included.

5. How to disable Face ID in an instant: If you don’t want Face ID to require that you look with your eyes open at iPhone X, you can open Settings > General > Accessibility, and disable Require Attention for Face ID. This is automatically disabled if you enable VoiceOver during initial set up.
6. Flip quickly between apps
7. Save up to 60% battery life:  Check which wallpaper you using, Which apps running back and consuming energy.
8. Make Control Center easier to reach: Go to Settings > Accessibility > Reachability.
9. Quiet alarms with your Face: After picking it up, Face ID will look for your face, and if it see it, it’ll automatically lower the volume.
10. Animoji as stickers
11. Tap to wake: Many Android phones have had a “double-tap to wake” up the display feature for years. Now, iPhone X users have a similar feature, only it only requires a tap.
If you accidentally deleted or lost videos on iPhone, first please check on the Recently Deleted folder. Alternatively, you can use the professional tool Gihosoft iPhone Recovery to recover deleted iPhone videos from Camera Roll or some apps.

toggle-airplane-mode-on-iphone

Way 5: Reset Network Settings on iPhone

Resetting your network settings can be a bit of a bother, especially if it’s just to fix an iCloud connection error. After following these steps you’ll have to reconnect to a Wi-Fi network.
  1. Tap on the “Settings” app and go to “General > Reset > Reset Network Settings”.
  2. Enter your passcode when prompted to confirm the reset.
  3. After your network settings have been reset, reconnect to your Wi-Fi and try connecting to iCloud.
check network settings
The only downside of this is that you have to reconnect to any Wi-Fi networks that you previously have your device connected to, but this is a small price to pay.

Way 6: Contact Apple for Support

If all else fails, consider giving Apple a call. Their specialists deal with these types of problems every day and will be willing to walk you through how you may be able to fix it.

Where Are My Ringtones in iTunes? How Do I Find Them? 2019 Guide

Where Are My Ringtones in iTunes? Finding out Here!

If you want to access the ringtones that you have stored on your computer, you can do this just as easily. The process involved to discover where are iTunes ringtones stored on computer will depend on whether you're on a Windows or a Mac computer. But, regardless, we've detailed the steps for both types of computer below.

Where Does iTunes store Ringtones on Windows PC

Step 1. Open a file explorer window and go to "Computer".
Step 2. From here, follow the path "Local Disk > Users > YourName > Music > iTunes > iTunes Media".
Step 3. All of your iTunes ringtones are stored in the "iTunes Media" folder.
iTunes-Media-Folder-Windows

Where Does iTunes store Ringtones on Mac

Step 1. Open a finder window and click "Go" followed by "Home".
Step 2. Double-click "Music" to reveal all of the music stored on your computer.
Step 3. Lastly, open the "iTunes" folder and similarly, you can access the iTunes library files from here.
iTunes-Media-Folder-Mac
Another option that you have is to simply open iTunes, connect your iPhone, and click on the drop-down menu at the top-left of iTunes (which is by default set to "Music"), and all of your iTunes ringtones will be shown here. But, if you want to move your iTunes library and ringtones or simply want to take a backup, you'll need to use one of the methods from above.
Bonus Tips:
11 BEST IPHONE X SECRET TIPS AND TRICKS EVERYONE SHOULD KNOW 2018
1. Open the App Switcher like a pro:
  1. Swipe up from the bottom to the middle of your screen and hold until you see the App Switcher.
  2. Swipe left or right to find the app that you want to use.
  3. Tap the app.
2. Bring back the home button (sort of): Go to General > Accessibility > AssistiveTouch and turn it on. You’ll now see a virtual home button that you can customize to activate shortcuts.
3. Unlock with Face ID faster: Turn off attention detection, Face ID needs a certain set of data each time it’s used, and there’s no getting around that. Face ID needs to be able to detect your eyes, nose, and mouth. While it can detect your eyes even when they’re closed (if attention is off), you’ll need to have your nose and mouth uncovered if you plan on unlocking your iPhone X with your face.
4. Show battery percentage: To show the battery percentage in the status bar, go to Settings > Battery and turn on Battery Percentage. Swipe down from the top-right corner of the iPhone X’s display to open Control Center, and check, the battery percentage is included.

5. How to disable Face ID in an instant: If you don’t want Face ID to require that you look with your eyes open at iPhone X, you can open Settings > General > Accessibility, and disable Require Attention for Face ID. This is automatically disabled if you enable VoiceOver during initial set up.
6. Flip quickly between apps
7. Save up to 60% battery life:  Check which wallpaper you using, Which apps running back and consuming energy.
8. Make Control Center easier to reach: Go to Settings > Accessibility > Reachability.
9. Quiet alarms with your Face: After picking it up, Face ID will look for your face, and if it see it, it’ll automatically lower the volume.
10. Animoji as stickers
11. Tap to wake: Many Android phones have had a “double-tap to wake” up the display feature for years. Now, iPhone X users have a similar feature, only it only requires a tap.
If you accidentally deleted or lost videos on iPhone, first please check on the Recently Deleted folder. Alternatively, you can use the professional tool Gihosoft iPhone Recovery to recover deleted iPhone videos from Camera Roll or some apps.


iTunes Music Downloader 2019Top List


Part 1: Use Music-oriented Podcasts to Get Free iTunes Music

Another way to listen to free music on iTunes is music-oriented podcasts. Podcasts are prerecorded radio shows. They include tunes and commentary. So if you do not mind listening to chatters between songs, check out these podcasts because they are totally free. To browse podcasts, go to the iTunes Store and click the Podcasts link, go to the column on the right that says 'Podcast Quick Links' and click the drop-down menu. Choose Music, and you'll see hundreds of music podcasts.
Part 3: Get Free Music on iTunes

The iTunes music downloader, along with offering paid songs, also offers selective free songs available in the iTunes selection. This helps you in downloading songs free of cost.

iTunes updates its free music range every week with new songs, so if you want that free music, do not hesitate to check the free songs list because there is a lot of good music there.


Part 4: Top 3 iTunes Music Downloader

What are the top 3 most recommended iTunes music downloaders? Well, here are the best ones for you. All these listed applications help users of iPhone, iPad or iPod to download music for their devices.
1. Freegal Music

It is one of the best music downloader for iOS users. Freegal Music is an application that enables users to download music legally. It has a wide collection of more than 9 million mp3 songs of various artists, of various genres, from all across the globe. The app is available in multiple languages including English, German, French, Spanish, Italian, and has been rated 4+.

The only con to the app is that it is region limited and hence only certain regions of the world can take 100% advantage of it.
2. SoundTube

Soundtube is a popular music downloader app. It is user-friendly; the interface is very convenient and has a good and wide range of song collection on various genres like rock, classic, country and others. It also allows to stream music from YouTube. Various features of the app include playing your favorite tunes, searching album, artist and songs, one tap music streaming, background music playback (A feature YouTube still doesn’t allow). Music through this app can also be shared on multiple social media platform.
3. Total Downloader

It is one of the most top rated music downloader apps available in the App Store. It not only allows downloading of music but also allows its users to download music videos.

The app comes packed with list of interesting features like multiple options of downloading, single tap downloading, multiple file support and others.

This application comes in multiple languages and the best part is, it is free to use.Bonus Tips:

11 BEST IPHONE X SECRET TIPS AND TRICKS EVERYONE SHOULD KNOW 2018

1. Open the App Switcher like a pro:


Swipe up from the bottom to the middle of your screen and hold until you see the App Switcher.


Swipe left or right to find the app that you want to use.


Tap the app.

2. Bring back the home button (sort of): Go to General > Accessibility > AssistiveTouch and turn it on. You’ll now see a virtual home button that you can customize to activate shortcuts.

3. Unlock with Face ID faster: Turn off attention detection, Face ID needs a certain set of data each time it’s used, and there’s no getting around that. Face ID needs to be able to detect your eyes, nose, and mouth. While it can detect your eyes even when they’re closed (if attention is off), you’ll need to have your nose and mouth uncovered if you plan on unlocking your iPhone X with your face.

4. Show battery percentage: To show the battery percentage in the status bar, go to Settings > Battery and turn on Battery Percentage. Swipe down from the top-right corner of the iPhone X’s display to open Control Center, and check, the battery percentage is included.


5. How to disable Face ID in an instant: If you don’t want Face ID to require that you look with your eyes open at iPhone X, you can open Settings > General > Accessibility, and disable Require Attention for Face ID. This is automatically disabled if you enable VoiceOver during initial set up.

6. Flip quickly between apps

7. Save up to 60% battery life: Check which wallpaper you using, Which apps running back and consuming energy.

8. Make Control Center easier to reach: Go to Settings > Accessibility > Reachability.

9. Quiet alarms with your Face: After picking it up, Face ID will look for your face, and if it see it, it’ll automatically lower the volume.

10. Animoji as stickers

11. Tap to wake: Many Android phones have had a “double-tap to wake” up the display feature for years. Now, iPhone X users have a similar feature, only it only requires a tap.

If you accidentally deleted or lost videos on iPhone, first please check on the Recently Deleted folder. Alternatively, you can use the professional tool Gihosoft iPhone Recovery to recover deleted iPhone videos from Camera Roll or some apps.


How to Fix Move to iOS Not Working 2019 Guide


General Methods When Move to iOS Not Working

Here are a few basic methods you can try if Move to iOS not working.
  • Method 1: Check The Network Connection on Both Devices
  • Method 2: Restart Both iOS & Android Devices
  • Method 3: Switch between Wi-Fi and Mobile Networks
  • Method 4: Put Android into Airplane Mode
  • Method 5: Download & Install Latest Firmware

Method 1: Check The Network Connection on Both Devices

The first thing you should do is make sure that both devices are connected to the same network. You can find the network settings for both iOS and Android within the “Settings” app. If they are connected to the same network and you can access the internet fine, the network isn’t the issue.
check-android-network-connection

Method 2: Restart Both iOS & Android Devices

Simply turning a device off can commonly fix this type of problems. Go ahead and turn both devices off -> wait a few minutes and turn them back on -> then try again.
restart-android

Method 3: Switch between Wi-Fi and Mobile Networks

If you’re moving from an Android device to an iOS device, disable the Android’s Wi-Fi connection and try using mobile networks instead. After a few minutes, if you don’t yield the results you need, try Wi-Fi again.
switch-wifi-and-mobile-networks

Method 4: Put Android into Airplane Mode

Another quick solution is to enable Airplane Mode for a few moments on your Android device. This completely shuts down the device’s network connections and can be helpful to fix Move to iOS not working.
put-android-into-airplane-mode

Method 5: Download & Install Latest Firmware

Most importantly, ensure that both devices have the most recent firmware installed. Every iOS and Android update includes bug fixes and if the problem you’re experiencing is already known, it may well be fixed.
update-android

Part 2: Alternative Way for Move to iOS Not Working

An alternative solution is to avoid the Move to iOS app altogether and take the manual approach. Below are the alternative fix which we can find for you.
  • Step 1: Move Files from Android to Computer via USB
  • Step 2: Transfer The Moved Files from Computer to Your iPhone via iTunes

Step 1: Move Files from Android to Computer via USB

Choose one according to the type of computer you’re using.
For Windows computers:
  1. Connect your Android device using a USB cable and unlock it.
  2. On the device, tap on the notification “USB for...” which appears and choose “Transfer files”.
  3. Back on your computer, a file explorer will appear. Drag the Android files to a folder on your computer that you can access later.
  4. When you’re finished transferring, disconnect your device.
transfer-files-from android-to-windows
For Mac computers:
  1. Connect your Android device with a lightning cable and unlock it.
  2. Download and install the “Android File Transfer” program.
  3. When a notification “USB for...” appears on your device, tap on it. Then select “Transfer files”.
  4. Back on your computer, use the Android File Transfer windows to drag files off of your device.
android-file-transfer-for-mac
Windows and Mac computers are very easy to use and help you when Move to iOS app not working. So after get your data off your Android, you can now drag the data onto iTunes and sync it with your iPhone.

Step 2: Transfer The Moved Files from Computer to Your iPhone via iTunes

  1. Use a lightning cable to connect your iPhone to a computer.
  2. Open iTunes and click on the device icon, then on “File Sharing” from the sidebar.
  3. Choose an app that you want to transfer data to from the list shown.
  4. Click “Add” and locate the files that you want to transfer to your iPhone.
move-files-from-computer-to-iphone-with-itunes
Repeat this process until you’ve transferred all of the data that you want to have on your iPhone.
Bonus Tips:
11 BEST IPHONE X SECRET TIPS AND TRICKS EVERYONE SHOULD KNOW 2018
1. Open the App Switcher like a pro:
  1. Swipe up from the bottom to the middle of your screen and hold until you see the App Switcher.
  2. Swipe left or right to find the app that you want to use.
  3. Tap the app.
2. Bring back the home button (sort of): Go to General > Accessibility > AssistiveTouch and turn it on. You’ll now see a virtual home button that you can customize to activate shortcuts.
3. Unlock with Face ID faster: Turn off attention detection, Face ID needs a certain set of data each time it’s used, and there’s no getting around that. Face ID needs to be able to detect your eyes, nose, and mouth. While it can detect your eyes even when they’re closed (if attention is off), you’ll need to have your nose and mouth uncovered if you plan on unlocking your iPhone X with your face.
4. Show battery percentage: To show the battery percentage in the status bar, go to Settings > Battery and turn on Battery Percentage. Swipe down from the top-right corner of the iPhone X’s display to open Control Center, and check, the battery percentage is included.

5. How to disable Face ID in an instant: If you don’t want Face ID to require that you look with your eyes open at iPhone X, you can open Settings > General > Accessibility, and disable Require Attention for Face ID. This is automatically disabled if you enable VoiceOver during initial set up.
6. Flip quickly between apps
7. Save up to 60% battery life:  Check which wallpaper you using, Which apps running back and consuming energy.
8. Make Control Center easier to reach: Go to Settings > Accessibility > Reachability.
9. Quiet alarms with your Face: After picking it up, Face ID will look for your face, and if it see it, it’ll automatically lower the volume.
10. Animoji as stickers
11. Tap to wake: Many Android phones have had a “double-tap to wake” up the display feature for years. Now, iPhone X users have a similar feature, only it only requires a tap.
If you accidentally deleted or lost videos on iPhone, first please check on the Recently Deleted folder. Alternatively, you can use the professional tool Gihosoft iPhone Recovery to recover deleted iPhone videos from Camera Roll or some apps.


Wednesday, July 11, 2018

Apple Censored the Taiwanese Flag on iPhones in China Until iOS 11.3

Apple has fixed a bug in iOS 11 that led iPhones and iPads with their region set to China to crash when the word “Taiwan” was entered in the text field or the Taiwan flag emoji was used.

The bug was present in all versions of iOS up until iOS 11.3 when it was documented by Digita Security’s Patrick Wardle.

The bug was present on a system level and affected all apps, so if someone sent you a Taiwanese flag on Facebook Messenger, WhatsApp or iMessage, they would all crash. Interestingly, the bug could be fixed by simply changing the region of the affected iPhone or iPad from China to the United States.Gihosoft Free iPhone Data Recovery is a professional iPhone Data Recovery software to get back all your lost text message, photo, video, call history, note, contact and more from iPhone/iPad/iPod Touch. It offers a full solution to recover your lost data in different tough situations. Besides recovering data directly from iPhone, iPad and iPod touch, it also allows you to recover data from iCloud and iTunes backup files.Image result for gihosoft iphone


While Apple has fixed the issue in iOS 11.4.1, there’s an interesting take here. In China, the Taiwanese flag is not shown even in the emoji keyboard. When one receives a message with a Taiwanese flag, the emoji is not rendered on the device as well. This essentially confirms that while the bug was due to an error from Apple’s part, the company is willing to make small modifications to its OS to please the Chinese government.

There are political and legal tensions between China and Taiwan, with the former considering Taiwan as a part of its sovereignty while Taiwan considers itself an independent democracy.

This is not the first time that Apple has done something like this. The company first removed hundreds of thousands of VPN apps from the iOS App Store last year to conform to Chinese government regulations. Then, this year, it removed apps featuring CallKit integration from the App Store again due to government regulations.

Since China is an important market for Apple, there’s not much the company can do here except ensure that it is meeting the demands of the Chinese government to ensure its business activities are not affected in the country.

[Via Objective]

Best iPhone 11 and iPhone 11 Pro Deals

It is rare to find good deals on new iPhones due to the initial rush. With the iPhone 11 and iPhone 11 Pro though, things are a bit differe...